
How to Create Android App Icons using Image Asset Studio
Creating an application interface that user will like and will be unlikely to forget can be intimidating. But creating an attractive launcher icon for your app, that the user will first come across while looking at your app, anyway needs more brainstorming. For Android, you need to create these graphics that have to be compatible and supporting to all devices running Android, sizes varying from a smartphone to TV. The introduction of Android Image Asset Studio in Android Studio has made it easy. In this article, you will see how you can easily create your application icon in one go.
You can refer to the video if you are more comfortable with those. For Launcher and ActionBar Icons:
For Notification Icon:
Image Asset Studio is a tool introduced in Android Studio 3. It can be used to generate app icons for all the screen densities in one go, using custom images, material design icons as well as text strings. Application icon in Android includes the following,
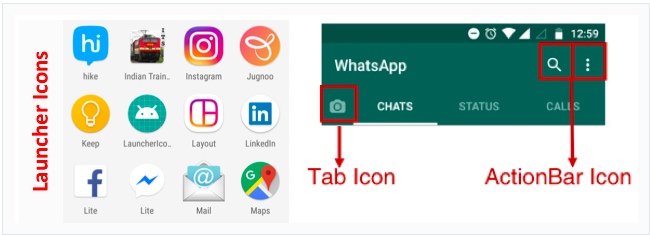
- Launcher Icon: represents your app and the first thing that user sees
- ActionBar Icon & Tab Icon: representing actions in the ActionBar and Tabs of the app
- Notification Icon: represents your app notification when a user is outside your app
Here is a list of icon/image sizes that you need to create for different screen densities, for each image that you use in your application. No matter if you are a good designer, creating each of these is tedious!

Image Asset Studio helps to create all these icons for all screen densities and stores them in respective density folders. It provides a preview of all the icons that will be created, in different shapes, with options to edit them. Let’s see how to create each one of them.
Run Image Asset Studio
- In the Project Window, select the project hierarchy.
- Right-click on the res folder and choose New -> Image Asset.
- Create the icon for your app i.e.
- Launcher icon which may be Adaptive and Legacy Launcher Icon (if your app supports Android 8.0 or above) or just the Legacy Launcher Icon(for Android version less than or equal to 7.1)
- ActionBar Icons and Tab Icons
- notification icon as per your requirement.
- You can select the following Asset Type. The icon appears on the right side, in the preview panel.
Custom Image
You can use custom images of PNG (recommended), JPG or GIF (avert) format and adjust it to create icons. Set the path of your custom image if you select this.
Clip Art
You can select the icons from the list of Google Material Design Icons provided in the dialog. Click on the clip art icon to get the dialog with icon set.
Text String
You can use the fonts installed on your computer to generate the icons out of the text strings. It will create these text-based icons in PNG format in respective drawable-density folders. Set the string and select the font to use it.
Creating Launcher Icon
Launcher Icons represent our app in the device home screen, on the app list screen, in the Google Play Store and everywhere else. Android 8.0 (Oreo) and above supports Adaptive Icons and can be displayed in different shapes across various platforms. Image Asset Studio provides the option to create these adaptive icons as well as the legacy icons for Android 8.0 below. It also creates the web icons(512 x 512 px) that represents our app on the Google Play Store.
The Launcher Icons are stored in the res/mipmap-density folder.
Adaptive and legacy launcher icon
If your app doesn’t support android version 8.0 or above, create legacy icon only for your app.
After opening Image Asset Studio, follow the steps below to create the legacy icons for your android app.
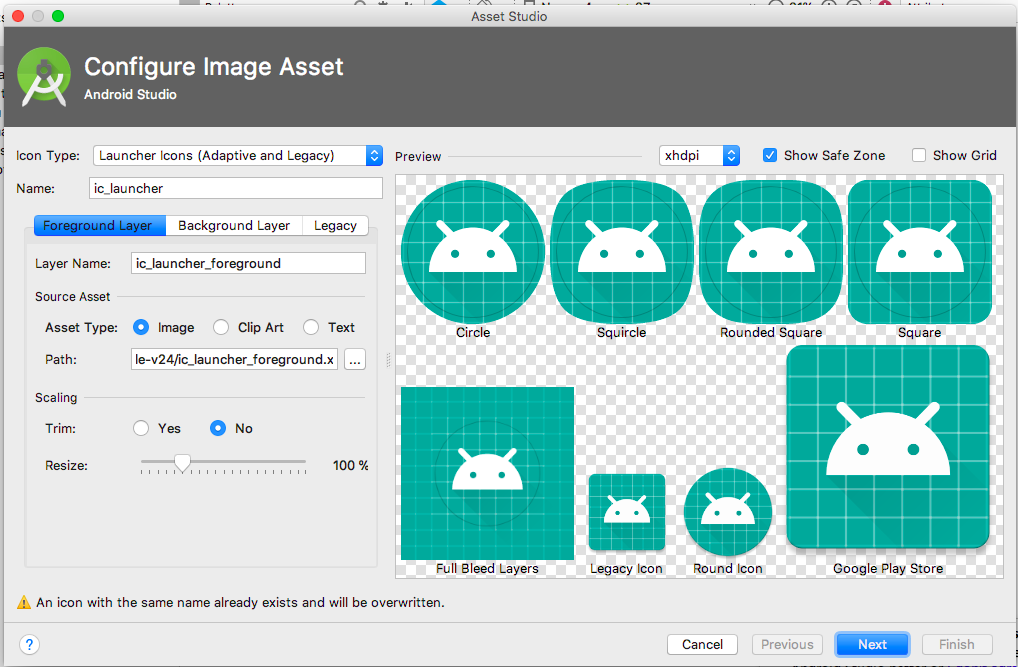
- For Icon Type field, select Launcher Icons (Adaptive & Legacy).
- For Foreground Layer tab, select the Asset type to be an image, clip art or text.
- Then for the Background Layer tab, select a Color or set the Image path for the Asset type to set the background.
- Then the Legacy tab, check the default settings. You can choose whether you want to generate the legacy icon, round icon and the icon for the web(Google Play Store Icon).
- Optionally
- Name: Change the name of the foreground and background layer. If the resource with the specified name exists, it will be indicated by an error message. The name can contain lowercase characters, digits and underscore only.
- Trim: Chose yes to adjust the margin between the foreground icon graphic and the background, else select no to keep the source asset as it is.
- Color: Set the color for the clip art or the text asset. Click the field, select the color, click chose and preview your icon.
- Resize: Use the slider to resize your icon. It is disabled for background layer where Color is the asset type.
- Hit Next
- Chose the resource directory for your image asset.
- main/res: For all source set including debug and release
- debug/res: For debugging only
- release/res: For only one version of build, overrides main source set
- custom source set: To define a new source set File -> Project structure -> app -> Build Types. Refer to Configure Build Variants for details
Output Directories shows the list of folders in which the icons will be created in the Project view in Project Window.
- Click Finish.
Check the mipmap folders for the Launcher Icons.
Legacy launcher icon only
If your app supports android version 8.0 or above, create adaptive and legacy launcher icon for your app.
After opening Image Asset Studio, follow the steps below to create adaptive and legacy icons for your android app.
- For Icon Type field, select Launcher Icons (Legacy Only).
- Select the Asset type to be an image, clip art or text.
- Optionally
- Name: Change the name of the icon if you don’t want to use the default name. If the resource with the specified name exists, an error message will indicate it. The name can contain lowercase characters, digits and underscore only.
- Trim: Chose yes to adjust the margin between the foreground icon graphic and the background, else select no to keep the source asset as it is.
- Padding: Adjust the source set padding for all four sides. You will have the review on the right side.
- Foreground: Set the color for the clip art or the text asset. Click the field, select the color, click chose and preview your icon.
- Background: Set the color for the background. Click the field, select the color, click chose and preview your icon.
- Scaling: Select crop or Shrink to fit to fit the icon size
- Shape: Select the shape to set a backdrop for the icon. For transparent, select none.
- Effect: Select dogear if you want the dogear effect for your icon, else select none.
- Hit Next
- Chose the resource directory for your image asset.
- main/res: For all source set including debug and release
- debug/res: For debugging only
- release/res: For only one version of the build, overrides main source set
- custom source set: To define a new source set File -> Project structure -> app -> Build Types. Refer to Configure Build Variants for details
- Click Finish.
Check the mipmap folders for the Launcher Icons.

Creating ActionBar Icons and Tab Icons
ActionBar icons are the ones present on the ActionBar that represents individual action. Whereas, the tab icons are used in the apps having multiple tabs. Using material icons for this category is recommended.
The ActionBar and Tab Icons are stored in the res/drawable-density folder.
You can also use Vector Asset Studio to have XML vectors for these categories of icons. It will reduce the size of your APK considerably.
After opening Image Asset Studio, follow the steps below to create actionbar and tab icons for your android app.
- For Icon Type field, select Action Bar and Tab Icons.
- Select the Asset type to be an image, clip art or text.
- Optionally
- Name: Change the name of the icon if you don’t want to use the default name. If the resource with the specified name exists, an error message will indicate it. The name can contain lowercase characters, digits and underscore only.
- Trim: Chose yes to adjust the margin between the foreground icon graphic and the background, else select no to keep the source asset as it is.
- Padding: Adjust the source set padding for all four sides. You will have the review on the right side.
- Theme: Select holo_light or holo_dark as per your app theme. Select custom to set a custom color for the icon.
- Hit Next
- Chose the resource directory for your image asset.
- main/res: For all source set including debug and release
- debug/res: For debugging only
- release/res: For only one version of build, overrides main source set
- custom source set: To define a new source set File -> Project structure -> app -> Build Types. Refer to Configure Build Variants for details
- Click Finish.
Check the drawable folders for the Icons created.
Creating Notification icons
The user sees the notification when he is outside your app. Notification icons come up with these notifications.
The Notification Icons are stored in the res/drawable-density folder. There are a few other folders created too.
- for Android 2.2 (API 8) or lower – icons stored in res/drawable-density
- for Android 2.3 to 2.3.7 (API 9 & 10) – icons stored in res/drawable-density-v9. Gray version of the icon is created
- Android 3 (API 11) or higher – icons stored in res/drawable-density-v11. A white version of the icon is created.
After opening Image Asset Studio, follow the steps below to create notification icons for your android app.
- For Icon Type field, select Notification Icons.
- Select the Asset type to be an image, clip art or text.
- Optionally
- Name: Change the name of the icon if you don’t want to use the default name. If the resource with the specified name exists, an error message will indicate it. The name can contain lowercase characters, digits and underscore only.
- Trim: Chose yes to adjust the margin between the foreground icon graphic and the background, else select no to keep the source asset as it is.
- Padding: Adjust the source set padding for all four sides. You will have the review on the right side.
- Hit Next
- Chose the resource directory for your image asset.
- main/res: For all source set including debug and release
- debug/res: For debugging only
- release/res: For only one version of build, overrides main source set
- custom source set: To define a new source set File -> Project structure -> app -> Build Types. Refer to Configure Build Variants for details
- Click Finish.
Check the drawable folders for the Icons created.
How to Delete an App Icon from a project
To delete the app icon,
- Select Android View in Project Window
- Expand the mipmap and drawable folder for the launcher and other icons respectively.
- Select the sub-folder that matched the name of your icon. It contains the icons of all densities that you created.
- Right-click on the sub-folder and hit delete.
Dialog for Safe Delete appears. - If you want, select options to find the places where the icon is used and hit OK.
If you chose to search for usage and the icon has any use in the project, you can view it and then confirm delete. You should delete or replace this reference to successfully compile the project. Android Studio then deletes the file from the project and the drive. - Chose Build -> Clean Project.
What if you do not have the local “Image Asset” option, when you right click on the res directory?
Creating ActionBar Icons and Tab Icons:
How could I use .jpg files instead? I didn’t see any option to change format.
Thanks for sharing this article. Your step-by-step explanation in article really help me to understand how to create attractive Android App Icons for application.
Thank you for the information!
I used to be suggested this web site via my cousin. I’m not
positive whether or not this submit is written by means of him as nobody else know such targeted approximately my trouble.
You are amazing! Thanks!
Thanks for the article.
Awesome
The post is really good
amazing..thank you for this information
superb
thanks for this writting
it is really great information..thanks for sharing
Thankful for sharing an amazing write-up!